最近尝试做了一个前端React,后端Java的应用,简单学习了一下React,在此做下记录。此文是初学者记录技术使用方法的文档,由于匆匆记录,错误必然百出,不过由于时间和精力有限,只能先做到这个地步了。
0. 碎碎念 有一个迷思一直困扰着自己:写技术博客必须要挖深技术,如果是很简单、很基础的内容,就不值得或者不好意思发出来,会露怯,让人觉得自己技术菜。但是这种想法有时会害了自己:技术本来处于初学阶段,强行拔高技术深度会力有不逮,很容易就坚持不下去;但是写点很基础,大家随便在百度上就能找到的内容,就会有点low,拿不出手。
我是这么认为的:首先,技术博客首先是为了结构化梳理自己学到的东西,如果能夹杂着自己的一些思考和深挖就更好了,首先是为了自己学习;其次如果能让读自己博客的人有点思考,就已经是不错的内容了。不是人人都是Linus,不是人人都是Goslin,用自己的话把学到的东西记录下来,后面忘记的时候过来翻翻,很快就能上手写代码,我觉得对于一篇博客来讲,就及格了。
至于博客中的深入思考,个人觉得是你在对基础有广度和深度(此处广度优于深度)都有一定的理解后,再来考虑的事。立意深远是值得鼓励的,但是仍需要脚踏实地,一步一步往前走,踩的够深、踩的够稳,才有机会写出优秀的内容。做好自己,在有余力时多深思,这就足够了。
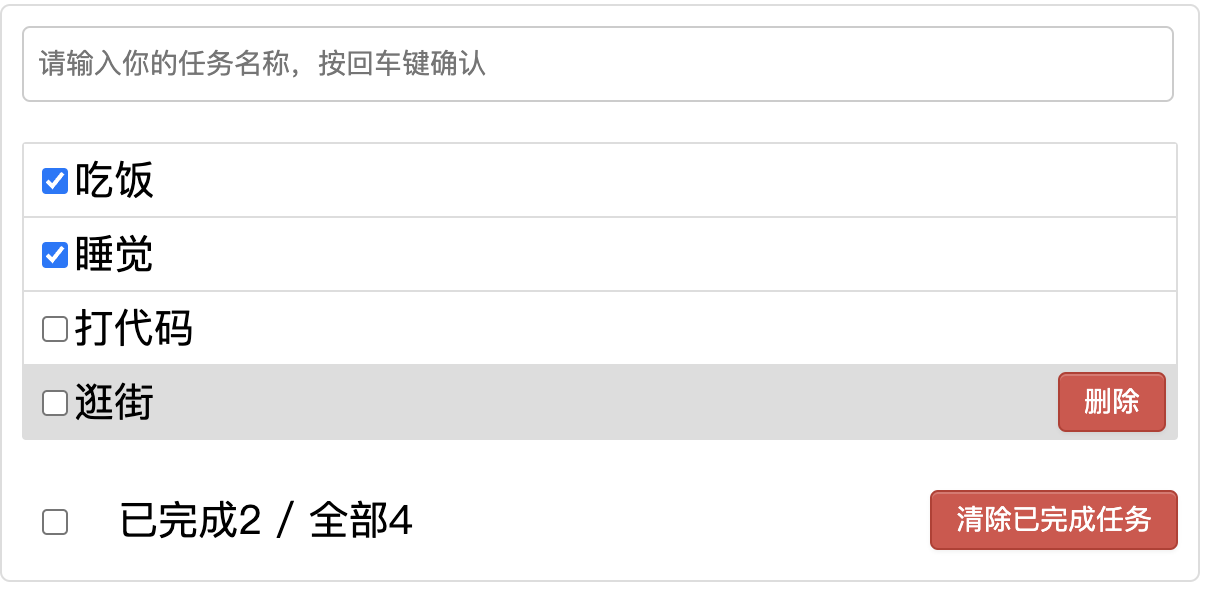
1. Quick Demo 先从一个任务管理的例子开始:
1.1 功能拆分 简单总结一下功能:
新增任务
任务列表
单个任务,鼠标hover后背景变深、展示删除按钮
单个任务,可以通过前面的checkbox选择已完成或者未完成
单个任务,如果点击删除后,任务消失
任务状态总结
下面任务总结栏,对当前已完成和全部任务的数量进行总结
点击checkbox能实现所有任务的已完成/未完成状态切换
点击“清除已完成任务”,删除所有已完成任务,并更新任务数量
1.2 静态代码 这个例子的完整html文件如下,css文件请看这里 。
1
2
3
4
5
6
7
8
9
10
11
12
13
14
15
16
17
18
19
20
21
22
23
24
25
26
27
28
29
30
31
32
33
34
35
36
37
38
39
40
41
42
43
44
45
46
47
48
49
50
51
52
53
54
55
56
57
58
59
60
61
62
<!DOCTYPE html > <html lang ="en" > <head > <meta charset ="utf-8" /> <link rel ="stylesheet" href ="./orginal.css" /> <title > React App</title > </head > <body > <div id ="root" > <div class ="todo-container" > <div class ="todo-wrap" > <div class ="todo-header" > <input type ="text" placeholder ="请输入你的任务名称,按回车键确认" /> </div > <ul class ="todo-main" > <li style ='background-color:white' > <label > <input type ="checkbox" checked =false /> <span > 吃饭</span > </label > <button class ="btn btn-danger" style ='display:block' > 删除</button > </li > <li style ='background-color:white' > <label > <input type ="checkbox" checked =false /> <span > 睡觉</span > </label > <button class ="btn btn-danger" style ='display:block' > 删除</button > </li > <li style ='background-color:#ddd' > <label > <input type ="checkbox" /> <span > 打代码</span > </label > <button class ="btn btn-danger" style ='display:block' > 删除</button > </li > <li style ='background-color:white' > <label > <input type ="checkbox" /> <span > 逛街</span > </label > <button class ="btn btn-danger" style ='display:block' > 删除</button > </li > </ul > <div class ="todo-footer" > <label > <input type ="checkbox" /> </label > <span > <span > 已完成2</span > / 全部3 </span > <button class ="btn btn-danger" > 清除已完成任务</button > </div > </div > </div > </div > </body > </html >
基础的html和CSS有了,再加上js文件就可以实现这个任务管理小页面了。现在需要用React重写。
2. 静态组件拆分 2.1 React文件结构 在此先说下一般React项目的文件结构
1
2
3
4
5
6
7
8
9
10
11
12
13
14
- my-app/ - node_modules/ - public/ - index.html - src/ - App.css - App.js - index.js - logo.svg - serviceWorker.js - reportWebVitals.js - setupTests.js - package.json - package-lock.json
index.js格式一般比较固定,它是React的渲染入口
1
2
3
4
5
6
7
8
//引入react核心库 import React from 'react' //引入ReactDOM import ReactDOM from 'react-dom' //引入App import App from './App' // 使用index.html中id为root的标签进行渲染 ReactDOM.render(<App/>,document.getElementById('root'))
在index.js中引入了App,我们来看看App。其实App其实也是一个React Component,我们可以通过在App中引入新的组件和CSS样式来优化我们的项目。
1
2
3
4
5
6
7
8
9
10
11
12
13
14
15
16
import React, { Component } from 'react' // export default表示导出App组件,这样其它组件也可以引用它 export default class App extends Component { // 组件都写在render方法里 render() { return ( // 这里添加所有要展示的元素,可以添加HTML代码,也可以 // 通过{}的形式引入js代码 // 此处我们直接引入刚才前面HTML的内容,但需要做下替换 // class由于是关键字 class -> className // style由单引号改为对象,放到{{}}里 ) } } // export的另一种写法,如果这样写了,class前的export default要去掉 // export default App
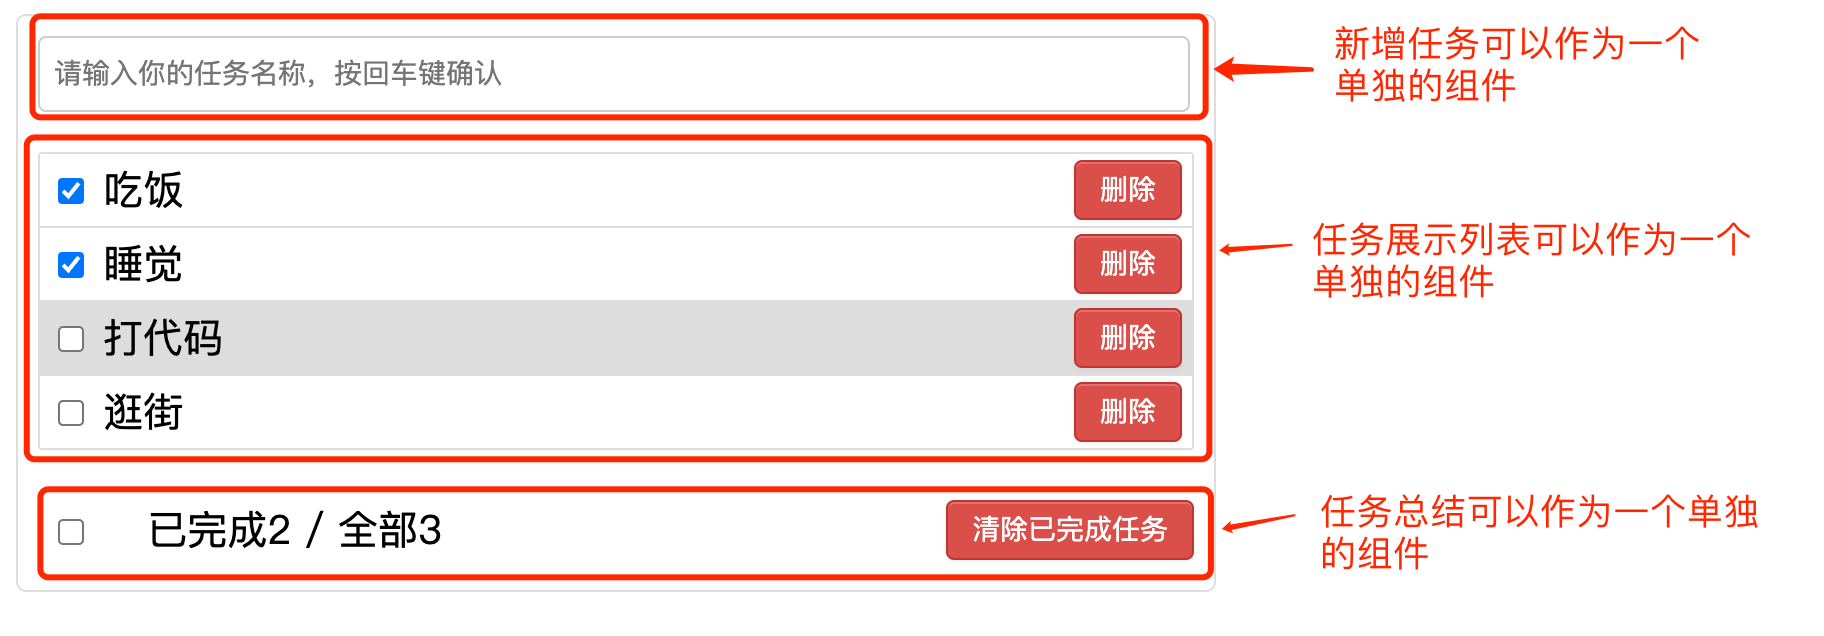
2.2 组件拆分 React的思想是一个相对完整的逻辑单元 可以拆分成一个组件Component,也就是说此页面可以拆分称若干个组件,根据上面的功能划分尝试拆分:
根据刚才图片上组件的划分,我们分为3个组件,那么可以先建立组件的文件,建立后文件结构如下:
1
2
3
4
5
6
7
8
9
10
11
12
13
14
15
16
17
18
19
20
21
22
- my-app/ - build/ - node_modules/ - public/ - src/ - App.css - App.js - index.js - components/ - List/ - index.jsx - index.css - Header/ - index.jsx - index.css - Footer/ - index.jsx - index.css - Item - index.jsx - index.css - package.json
除了分析得出的三个组件,还新增了一个Item组件,其实新增的这个组件主要是为了List组件能更好的操作任务,List中会引入多个Item,Item不会在App中直接引用。
现在App的代码如下:
1
2
3
4
5
6
7
8
9
10
11
12
13
14
15
16
17
18
19
20
21
22
23
24
import React, { Component } from 'react' import Header from './components/Header' import List from './components/List' import Footer from './components/Footer' import './App.css' export default class App extends Component { // 组件都写在render方法里 render() { return ( // 任务管理的container <div className="todo-container"> <div className="todo-wrap"> <!-- 代表新增任务栏 --> <Header /> <!-- 代表任务列表 --> <List/> <!-- 代表任务总结状态栏 --> <Footer /> </div> </div> ) } }
而把刚才原始HTML中的HTML元素都放到各自组件中:
Header/index.jsx
1
2
3
4
5
6
7
8
9
10
11
12
13
import React, { Component } from 'react' import './index.css' export default class Header extends Component { render() { return ( <div className="todo-header"> <input type="text" placeholder="请输入你的任务名称,按回车键确认"/> </div> ) } }
List/index.jsx
1
2
3
4
5
6
7
8
9
10
11
12
13
14
15
import React, { Component } from 'react' import Item from '../Item' import './index.css' export default class List extends Component { render() { return ( <ul className="todo-main"> <!-- 此处由于代码还未完成只有一个Item,不影响后续加上 --> <Item /> </ul> ) } }
Item/index.jsx
1
2
3
4
5
6
7
8
9
10
11
12
13
14
15
16
17
18
import React, { Component } from 'react' import './index.css' export default class Item extends Component { render() { return ( // style使用{{}}处理 <li style={{backgroundColor: 'white'}} > <label> <input type="checkbox" /> <span>吃饭</span> </label> <button className="btn btn-danger" style={{display:'block'}}>删除</button> </li> ) } }
Footer/index.jsx
1
2
3
4
5
6
7
8
9
10
11
12
13
14
import React, { Component } from 'react' import './index.css' export default class Footer extends Component { render() { return ( <div className="todo-footer"> <label><input type="checkbox" /></label> <span><span>已完成0</span> / 全部1</span> <button className="btn btn-danger">清除已完成任务</button> </div> ) } }
此时静态代码已经基本拆分完毕,CSS由于不是本文重点,此处不详述,只需要知道,是哪些组件要用的CSS,就放到哪个组件的index.css文件下。
3. 动态功能实现 看下上面的功能总结,并和上面抽象的组件对应起来:
新增任务(Header)
任务列表(List / Item)
单个任务,鼠标hover后背景变深、展示删除按钮
单个任务,可以通过前面的checkbox选择已完成或者未完成
单个任务,如果点击删除后,任务消失
任务状态总结(Footer)
下面任务总结栏,对当前已完成和全部任务的数量进行总结
点击checkbox能实现所有任务的已完成/未完成状态切换
点击“清除已完成任务”,删除所有已完成任务,并更新任务数量
挨个来实现一下:
3.1 组件之间数据流通 首先我们要明确一下,任务的数据在哪里保存。由于这是个简单的项目,数据我们直接保存在前端代码中,具体放在哪个组件里,简单分析下:
新增任务时:Header把数据传给List,List展示
管理单个任务时(删除/修改状态):List(Item)内部修改
任务状态总结:Footer拿到所有数据的状态,并且可以进行删除和状态修改操作
通过上述分析,我们发现数据需要在各个组件中来回流转。React提供了2种方式来在多个组件中流转(可能不止,不过此处只学到了2种):
父Component中保存数据,传给子Component,同时提供操作数据的方法,也一并传给子Component,这样子Component通过调用父Component的方法可以操作数据。(此处的父和子Component的定义是:如果一个Component A引用了其它Component B,那么A就是B的父Component,而B是A的子Component)
通过事件订阅-发布机制来流转数据,可以使用pubsub-js库
可以看到第一种比较麻烦,第二种更灵活,但是为了学习基础知识,我们先用第一种。
数据经过分析有:任务的名称、任务的状态。我们在父Component App中新增
1
2
3
4
5
6
7
8
//初始化状态 state = { todos:[ {id:'001',name:'吃饭',done:true}, {id:'002',name:'睡觉',done:true}, {id:'003',name:'打代码',done:false}, {id:'004',name:'逛街',done:false} ]}
此处新增了一个id是因为列表是遍历todos数组生成的,如果列表中没有独一无二的key,React会报warning,一会儿写相关代码时会提到。
3.2 功能具体实现 除了保存任务的数据以外,必须还有添加任务、更新任务状态、删除任务的函数:
1
2
3
4
5
6
7
8
9
10
11
12
13
14
15
16
17
18
19
20
21
22
23
24
25
26
27
28
29
30
31
32
33
34
//addTodo用于添加一个todo,接收的参数是todo对象 addTodo = (todoObj)=>{ //获取原todos const {todos} = this.state //追加一个todo const newTodos = [todoObj,...todos] //更新状态 this.setState({todos:newTodos}) } //updateTodo用于更新一个todo对象 // done表示要更新到的状态,可能是已完成true或者未完成false updateTodo = (id, done)=>{ //获取状态中的todos const {todos} = this.state //匹配处理数据 const newTodos = todos.map((todoObj)=>{ if(todoObj.id === id) return {...todoObj,done} else return todoObj }) this.setState({todos:newTodos}) } //deleteTodo用于删除一个todo对象 deleteTodo = (id)=>{ //获取原来的todos const {todos} = this.state //删除指定id的todo对象 const newTodos = todos.filter((todoObj)=>{ return todoObj.id !== id }) //更新状态 this.setState({todos:newTodos}) }
还有Footer的功能:更改所有的任务状态和删除已完成的任务
1
2
3
4
5
6
7
8
9
10
11
12
13
14
15
16
17
18
19
20
21
22
23
//checkAllTodo用于全选任务或者全不选 checkAllTodo = (done)=>{ //获取原来的todos const {todos} = this.state //加工数据 const newTodos = todos.map((todoObj)=>{ return {...todoObj,done} }) //更新状态 this.setState({todos:newTodos}) } //clearAllDone用于清除所有已完成的 clearAllDone = ()=>{ //获取原来的todos const {todos} = this.state //过滤数据 const newTodos = todos.filter((todoObj)=>{ return !todoObj.done }) //更新状态 this.setState({todos:newTodos}) }
3.3 组装后的代码 接下来就是组装代码的过程,组装后的App.jsx
1
2
3
4
5
6
7
8
9
10
11
12
13
14
15
16
17
18
19
20
21
22
23
24
25
26
27
28
29
30
31
32
33
34
35
36
37
38
39
40
41
42
43
44
45
46
47
48
49
50
import React, { Component } from 'react' import Header from './components/Header' import List from './components/List' import Footer from './components/Footer' import './App.css' export default class App extends Component { //初始化状态 state = { //... } addTodo = (todoObj)=>{ //... } updateTodo = (id,done)=>{ //... } deleteTodo = (id)=>{ //... } checkAllTodo = (done)=>{ //... } clearAllDone = ()=>{ // ... } render() { // 拿到当前的所有任务 const {todos} = this.state return ( <div className="todo-container"> <div className="todo-wrap"> <!-- 将添加任务的方法传给Header --> <Header addTodo={this.addTodo}/> <!-- 将所有任务数据、更新单个任务状态和删除单个的方法传给List --> <List todos={todos} updateTodo={this.updateTodo} deleteTodo={this.deleteTodo} /> <!-- 将所有任务数据(为了统计任务数量)、更新全部任务状态和删除全部的方法传给Footer --> <Footer todos={todos} checkAllTodo={this.checkAllTodo} clearAllDone={this.clearAllDone} /> </div> </div> ) } }
此处对于出现过的代码有所精简,如果要查看全部代码请看这里 。
要记住的一点是:状态在哪里,操作状态的方法就在哪里。
现在更新每个组件的代码:
Header/index.jsx
1
2
3
4
5
6
7
8
9
10
11
12
13
14
15
16
17
18
19
20
21
22
23
24
25
26
27
28
29
30
31
32
33
34
35
36
37
38
39
40
41
42
43
44
import React, { Component } from 'react' // prop-types可以对类型做约束 import PropTypes from 'prop-types' // 引入一个随机数生成库来处理列表中缺少key时warning的问题 import {nanoid} from 'nanoid' import './index.css' export default class Header extends Component { //对接收的props进行:类型、必要性的限制 static propTypes = { addTodo:PropTypes.func.isRequired } // 键盘事件的回调,调用后会传入一个event对象,里面 // 有事件触发后的各种数据,如按键对应的keyCode和 // 按键后生成的值 handleKeyUp = (event)=>{ //解构赋值获取keyCode,target const {keyCode,target} = event //判断是否是回车按键 if(keyCode !== 13) return //添加的todo名字不能为空 if(target.value.trim() === ''){ alert('输入不能为空') return } //准备好一个todo对象 const todoObj = {id:nanoid(),name:target.value,done:false} //将todoObj传递给App this.props.addTodo(todoObj) //清空输入 target.value = '' } render() { return ( <div className="todo-header"> <!-- 此处监听input标签的onKeyUp事件,如果有按钮按下后松开,这个事件就会被触发,对应的handleKeyUp方法就会被调用 --> <input onKeyUp={this.handleKeyUp} type="text" placeholder="请输入你的任务名称,按回车键确认"/> </div> ) } }
List/index.jsx
1
2
3
4
5
6
7
8
9
10
11
12
13
14
15
16
17
18
19
20
21
22
23
24
25
26
27
28
29
30
import React, { Component } from 'react' import PropTypes from 'prop-types' import Item from '../Item' import './index.css' export default class List extends Component { //对接收的props进行:类型、必要性的限制 static propTypes = { todos:PropTypes.array.isRequired, updateTodo:PropTypes.func.isRequired, deleteTodo:PropTypes.func.isRequired, } render() { // 通过props拿到App传来的数据和方法 const {todos,updateTodo,deleteTodo} = this.props return ( <ul className="todo-main"> { <!-- map方法遍历todos --> todos.map( todo =>{ <!-- key传给Item防止warning,{...todo}是直接把todos传给Item,同时传入2个方法 --> return <Item key={todo.id} {...todo} updateTodo={updateTodo} deleteTodo={deleteTodo}/> }) } </ul> ) } }
Footer/index.jsx
1
2
3
4
5
6
7
8
9
10
11
12
13
14
15
16
17
18
19
20
21
22
23
24
25
26
27
28
29
30
31
32
33
34
import React, { Component } from 'react' import './index.css' export default class Footer extends Component { //全选checkbox的回调 handleCheckAll = (event)=>{ this.props.checkAllTodo(event.target.checked) } //清除已完成任务的回调 handleClearAllDone = ()=>{ this.props.clearAllDone() } render() { const {todos} = this.props //已完成的个数 const doneCount = todos.reduce((pre,todo)=> pre + (todo.done ? 1 : 0),0) //总数 const total = todos.length return ( <div className="todo-footer"> <label> <input type="checkbox" onChange={this.handleCheckAll} checked={doneCount === total && total !== 0 ? true : false}/> </label> <span> <span>已完成{doneCount}</span> / 全部{total} </span> <button onClick={this.handleClearAllDone} className="btn btn-danger">清除已完成任务</button> </div> ) } }
Item/index.jsx
1
2
3
4
5
6
7
8
9
10
11
12
13
14
15
16
17
18
19
20
21
22
23
24
25
26
27
28
29
30
31
32
33
34
35
36
37
38
39
40
41
import React, { Component } from 'react' import './index.css' export default class Item extends Component { state = { mouse: false } //标识鼠标移入、移出 //勾选、取消勾选某一个todo的回调 handleCheck = (id) => { // 这里注意不是直接使用调用方法 // 而是返回了一个函数 return (event) => { this.props.updateTodo(id, event.target.checked) } } //鼠标移入、移出的回调 handleMouse = (flag) => { this.setState({ mouse: flag }) } //删除一个todo的回调 handleDelete = (id) => { if (window.confirm('确定删除吗?')) { this.props.deleteTodo(id) } } render() { const { id, name, done } = this.props const { mouse } = this.state return ( <li style={{ backgroundColor: mouse ? '#ddd' : 'white' }} onMouseEnter={this.handleMouse.bind(this, true)} onMouseLeave={this.handleMouse.bind(this, false)}> <label> <input type="checkbox" checked={done} onChange={this.handleCheck(id)} /> <span>{name}</span> </label> <button onClick={() => this.handleDelete(id)} className="btn btn-danger" style={{ display: mouse ? 'block' : 'none' }}>删除</button> </li> ) } }
3.4 带参数方法的绑定 这里注意:要绑定onClick、onMouseEnter、onMouseLeave等事件时,由于需要传入参数,如果直接使用onClick={this.handleDelete(id)}类似的方式直接调用,这个方法会在页面渲染后立即执行,而不是点击按钮时执行。原因是这样传参其实是传了方法调用后的返回值而不是方法本身。React提供了3种方式来解决这种情况:
原始情况:
1
2
3
4
5
6
7
8
9
10
handleDelete = () => { // 这里其实是删除的实际逻辑,我们用console打印一下日志代替一下 console.log('Click delete button!'); } <button className="btn btn-danger" // 如果这样直接调用的话,在页面渲染后,会立马打印方法里的文字 // 而不是在点击按钮后 onClick={this.handleDelete(id)} >删除</button>
使用bind关键字:
1
2
3
4
5
6
7
8
9
handleDelete = (id) => { // 这里其实是删除的实际逻辑,我们用console打印一下日志代替一下 console.log('Click delete button! Id = ' + id); } <button className="btn btn-danger" // 使用bind关键字后,只有点击按钮后才会打印方法里的文字 onClick={this.handleDelete.bind(this, id)} >删除</button>
方法返回一个函数
1
2
3
4
5
6
7
8
9
handleDelete = (id) => { // 这里改为返回一个函数,而不是直接执行逻辑 return () => console.log('Click delete button! Id = ' + id); } <button className="btn btn-danger" // 绑定后,只有点击按钮后才会打印方法里的文字 onClick={this.handleDelete(id)} >删除</button>
onClick绑定时使用函数的方式
1
2
3
4
5
6
7
8
handleDelete = (id) => { console.log('Click delete button! Id = ' + id); } <button className="btn btn-danger" // 使用函数式绑定,只有点击按钮后才会打印方法里的文字 onClick={() => this.handleDelete(id)} >删除</button>